Getting started with SQLite and Entity Framework
I am starting development on a ROM File management project that requires me to break my ties with SQL Server and IIS (I will cover the IIS portion in a later post) to make the application more accessible to my target audience. In addition to reducing the number of external dependencies, this approach is going to allow me to eventually wrap the application up as a windows service allowing it to run in the background.
This post serves as a living document for future reference, and as a quick start guide should you want to make use of SQLite and Entity Framework (EF) in your applications.
Adding in SQLite
The first thing we need to do is install SQLite, you can do this using the following command in the package manager console.
1
Install-Package System.Data.SQLite
This will install SQLite and all its dependencies, after the process has completed you should have the following packages installed:
- EntityFramework
- System.Data.SQLite
- System.Data.SQLite.Core
- System.Data.SQLite.EF6
- System.Data.SQLite.Linq
It is worth mentioning that EF Code First and SQLite don’t play well together “out of the box”, luckily for me I discovered SQLite.CodeFirst which bridges this gap and allows for code first database generation to work.
1
Install-Package SQLite.CodeFirst
Lastly, I needed to update EF as the version installed with System.Data.SQLite is slightly out of date.
Fixing EF - adding the missing bits
It seems that my installation of EF did not go as smoothly as I would have liked it to go, and there were a lot of “gaps” in the generator used to scaffold the Nuget package. I needed to make the below changes to get everything up and running.
First you will need to add the following provider to /entityFramework/providers in your App.config (or web.config) file:
1
<provider invariantName="System.Data.SQLite" type="System.Data.SQLite.EF6.SQLiteProviderServices, System.Data.SQLite.EF6" />
Next up, you will need to add in a connection string for your database.
1
2
3
<connectionStrings>
  <add name="default" connectionString="data source=app.db;" providerName="System.Data.SQLite" />
</connectionStrings>
That should do it for the basic configuration of EF, let’s move onto creating a simple database context and connecting to your database.
Creating the DbContext
Let’s start off by creating a model to be used with our test DB - I am going to call this User.
1
2
3
4
5
6
7
8
9
10
11
12
[Table("Users")]
public class User
{
    [Key, DatabaseGenerated(DatabaseGeneratedOption.Identity)]
    public long Id { get; set; }

    [Required]
    public string Name { get; set; }

    [Required]
    public DateTime Created { get; set; }
}
Something to note here, the version of SQLite I am using seems to store numbers as int64 (long), and keeps blowing up when attempting to read data back from it. Understandable as there is no conversion between int32 and int64 without running into an OverflowException.
Once we have our User class we can create our DbContext:
1
2
3
4
5
6
7
8
9
10
11
12
13
14
15
public class TestDbContext : DbContext
{
    public virtual DbSet<User> Users { get; set; }

    public TestDbContext()
        : base("default")
    { }

    protected override void OnModelCreating(DbModelBuilder modelBuilder)
    {
        var sqliteConnectionInitializer = new SqliteCreateDatabaseIfNotExists<TestDbContext>(modelBuilder);
        Database.SetInitializer(sqliteConnectionInitializer);

    }
}
Our context has been created, lets test it out by adding the following lines into the Main method of my test program:
1
2
var db = new TestDbContext();
var users = db.Users.ToList();
Adding in a break-point just after our select statement shows that we have successfully created and connected to our SQLite database, however we have no data to work with.
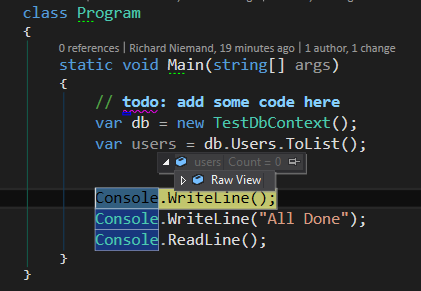
Success, our database file exists!

Adding a database initializer
Next up we will add in some code to populate some seed data when our database is created. However, to do this, we will need to delete the database in order for this code to run - it is designed to run only when the database is created. We can automate this for testing purposes by adding the following lines of code at the start of the Main method.
1
2
3
4
if (File.Exists("app.db"))
{
    File.Delete("app.db");
}
Now let’s add our initialization class using the provided SqliteDropCreateDatabaseWhenModelChanges<T> generic class.
1
2
3
4
5
6
7
8
9
10
11
12
13
14
15
16
public class MyDbContextInitializer : SqliteDropCreateDatabaseWhenModelChanges<TestDbContext>
{
    public MyDbContextInitializer(DbModelBuilder modelBuilder)
        : base(modelBuilder) { }

    protected override void Seed(TestDbContext context)
    {
        context.Users.Add(new User
        {
            Name = "Richard Niemand",
            Created = DateTime.Now
        });

        base.Seed(context);
    }
}
We will need to modify our TestDbContext to make it aware of our new initializer, to do this we will need to replace the OnModelCreating method with the following code.
1
2
3
4
5
protected override void OnModelCreating(DbModelBuilder modelBuilder)
{
    var sqliteConnectionInitializer = new MyDbContextInitializer(modelBuilder);
    Database.SetInitializer(sqliteConnectionInitializer);
}
Let’s do a quick test run to make sure that everything is working, bearing in mind that the database will be deleted when the application starts (so if you are using any tool to browse it, please close that now).

Success, we now have our seeded Richard Niemand user indicating that our seeder code is working as expected.
Exploring the Database
If you would like to explore the generated SQLite database you can do so with any SQLite compatible tool (I am using SQLite Studio in the screenshot below).
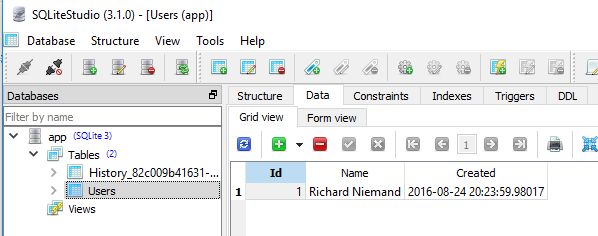
As you can see, we have our expected Users table along with an Entity Framework generated History table.
Comments powered by Disqus.