OctoPrint MQTT Events (with samples)
Below you will find a list of all the MQTT events published by the MQTT OctoPrint plugin. I made use of my MQTT-Dumper application I created in my previous post to do this, and have taken the time to format some of the responses.
For a complete list of all available plugins for OctoPrint please check out their official plugin list.
Printing Events
Print job started: octoprint/event/PrintStarted
1
2
3
4
5
6
7
8
9
{
  "origin": "local",
  "_event": "PrintStarted",
  "name": "NodeMCU_Case_-_35_gap.gcode",
  "file": "/.../NodeMCU_Case_-_35_gap.gcode",
  "path": "NodeMCU_Case_-_35_gap.gcode",
  "filename": "NodeMCU_Case_-_35_gap.gcode",
  "size": 2858607
}
Print job status: octoprint/progress/printing
1
2
3
4
5
{
  "progress": 57,
  "location": "local",
  "path": "NodeMCU_Case.gcode"
}
Z-Axis change: octoprint/event/ZChange
1
2
3
4
5
{
  "new": 9.0,
  "_event": "ZChange",
  "old": 8.8
}
Print job complete octoprint/event/PrintDone
1
2
3
4
5
6
7
8
9
10
{
  "origin": "local",
  "_event": "PrintDone",
  "name": "NodeMCU_Case.gcode",
  "file": "/.../NodeMCU_Case.gcode",
  "time": 5252.172917127609,
  "path": "NodeMCU_Case.gcode",
  "filename": "NodeMCU_Case.gcode",
  "size": 2823042
}
Printer state changes: octoprint/event/PrinterStateChanged
1
2
3
4
5
6
7
8
9
10
11
{
  "state_string": "Operational",
  "_event": "PrinterStateChanged",
  "state_id": "OPERATIONAL"
}

{
  "state_string": "Printing",
  "_event": "PrinterStateChanged",
  "state_id": "PRINTING"
}
Time Lapse
Image capture start: octoprint/event/CaptureStart
1
2
3
4
{
  "_event": "CaptureStart",
  "file": "/.../NodeMCU_Case_20170829185831-767.jpg"
}
Image capture complete: octoprint/event/CaptureDone
1
2
3
4
{
  "_event": "CaptureDone",
  "file": "/.../NodeMCU_Case_20170829185831-767.jpg"
}
Time lapse render start: octoprint/event/MovieRendering
1
2
3
4
5
6
7
{
  "movie": "/.../NodeMCU_Case_20170829185831.mpg",
  "_event": "MovieRendering",
  "movie_prefix": "NodeMCU_Case_20170829185831",
  "gcode": "NodeMCU_Case.gcode",
  "movie_basename": "NodeMCU_Case_20170829185831.mpg"
}
Time lapse render completed: octoprint/event/MovieDone
1
2
3
4
5
6
7
{
  "movie": "/.../NodeMCU_Case_20170829185831.mpg",
  "_event": "MovieDone",
  "movie_prefix": "NodeMCU_Case_20170829185831",
  "gcode": "NodeMCU_Case.gcode",
  "movie_basename": "NodeMCU_Case_20170829185831.mpg"
}
Temperatures
Hot End temperature: octoprint/temperature/tool0
1
2
3
4
{
  "actual": 211.88,
  "target": 210.0
}
Bed temperature: octoprint/temperature/bed
1
2
3
4
{
  "actual": 50.0,
  "target": 50.0
}
Parsing data in Node-RED
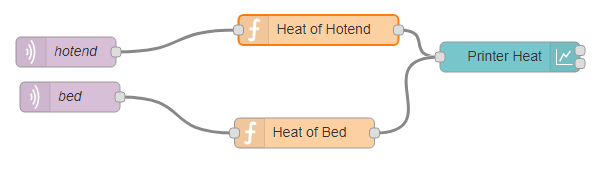
Lastly we will look into accessing this information using Node-RED and publishing it to a node-red-dashboard powered graph. Our flow will looks like this:
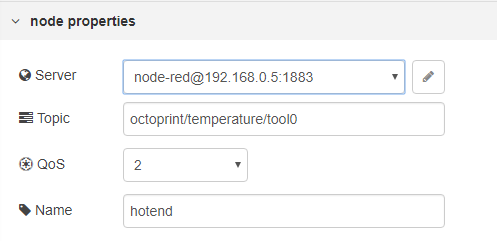
First we will need to subscribe to the relevant events on your MQTT broker (mine is hosted locally hence the IP Address), in the below case we are subscribing to the octoprint/temperature/tool0 event (a.k.a. the hot-end).
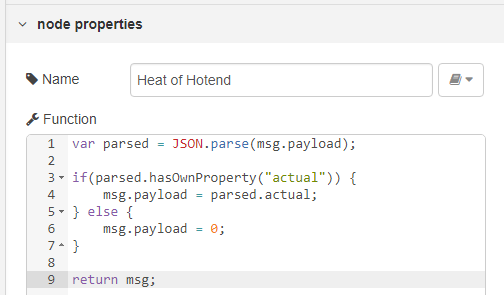
I then make use of a script block with the below code to JSON.parse(), extract and publish the collected information out as the msg.payload.
1
2
3
4
5
6
7
8
9
var parsed = JSON.parse(msg.payload);

if(parsed.hasOwnProperty("actual")) {
    msg.payload = parsed.actual;
} else {
    msg.payload = 0;
}

return msg;
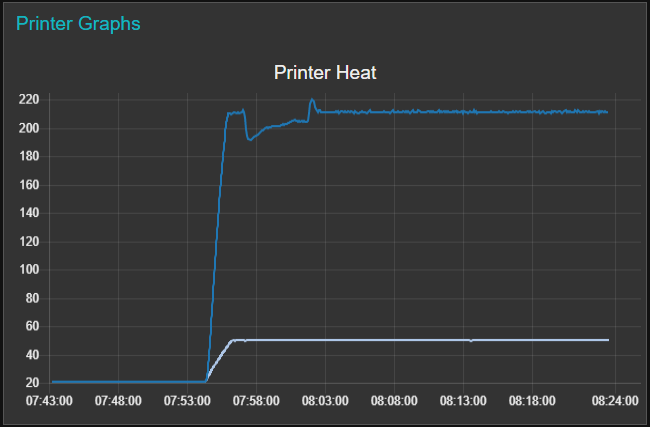
This feeds into a graph node (along with the bed temperature) and can be viewed on my dashboard as shown below:
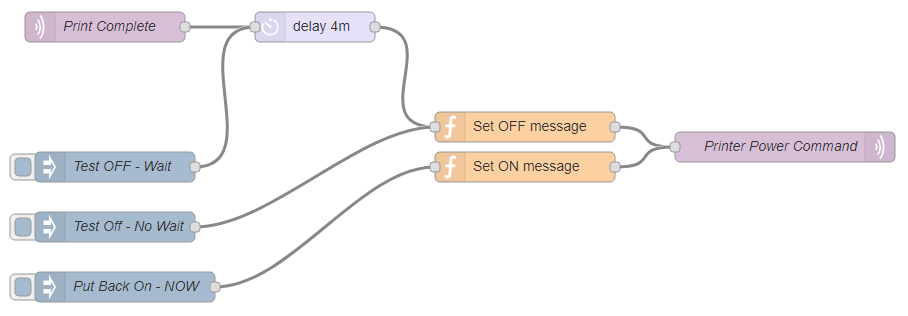
Knowing the events published by your print server allows for some rather interesting work flows (I’ll cover this in another post), shown below is my automated printer shutdown flow that powers down my printer using an IoT enabled power switch 4 minutes after a print job has completed.
Comments powered by Disqus.