SQLite and Dapper in C#
In this article I am going to cover the basics of running SQLite and Dapper in a C# console application. There is a lot of code below which may be highly opinionated (so please bear that in mind while reading it) with links to an example application on Github below should you wish to see it all in action.
Tools and Resources
While creating this article I made use of the following online resources and tools, and feel that the original authors should get the credit for the bits and pieces I used.
- SQLite Manager - SQLite query tool (Firefox extension)
- Getting started with SQLite in C# - used as a guideline
- How to create and connect to an SQLite database in C# - used as a guideline
- Datatypes In SQLite Version 3
- SQLite database default time value ‘now’ - yes I Googled this
- Random String Generator - swiped the generator bit
First Steps
First thing we need to do is create a new console application in Visual Studio and install SQLite and Dapper via the package manager console.
1
2
Install-Package System.Data.SQLite.Core
Install-Package Dapper
This will install the required files for SQLite and Dapper into your solution along with any dependencies that they might have.
Connecting to the Database
The connection strings used in SQLite are pretty straight forward seeing that it is a server-less database engine and for this project is as simple as Data Source=FilePath.sqlite;Version=3;. The connection does support additional parameters like credentials, but that is beyond the scope of this tutorial.
To connect to our database (and create it, if missing) add a CreateAndOpenDb() method with the following body:
1
2
3
4
5
6
7
8
9
10
11
12
13
14
private static SQLiteConnection _dbConnection;
// ...
static void CreateAndOpenDb()
{
    var dbFilePath = "./TestDb.sqlite";
    if (!File.Exists(dbFilePath))
    {
        SQLiteConnection.CreateFile(dbFilePath);
    }
    _dbConnection = new SQLiteConnection(string.Format(
        "Data Source={0};Version=3;", dbFilePath));
    _dbConnection.Open();
}
Quickly running the code confirms that I am able to create and connect to my new database.
Extension methods
I would suggest creating some extension/helper methods for common SQLite tasks to help speed up development, and will start off by creating a new SQLiteExtensions class as listed below:
1
2
3
4
5
6
7
8
9
10
11
12
13
14
15
16
17
18
19
public static void ExecuteNonQuery(
    this SQLiteConnection connection,
    string commandText)
{
    // Ensure we have a connection
    if (connection == null)
    {
        throw new NullReferenceException("Please provide a connection");
    }

    // Ensure that the connection state is Open
    if (connection.State != ConnectionState.Open)
    {
        connection.Open();
    }

    // Use Dapper to execute the given query
    connection.Execute(commandText);
}
Initial Database Seeding
After creating the DB you will need to create all the tables and objects that your application needs in order to run, I would suggest creating a seed method that gets called when the database is first created. Below is the contents of my SeedDatabase() method.
1
2
3
4
5
6
7
8
9
10
11
12
13
14
15
16
17
18
19
static void SeedDatabase()
{
    // Create a Users table
    _dbConnection.ExecuteNonQuery(@"
        CREATE TABLE IF NOT EXISTS [Users] (
            [Id] INTEGER NOT NULL PRIMARY KEY AUTOINCREMENT,
            [Username] NVARCHAR(64) NOT NULL,
            [Email] NVARCHAR(128) NOT NULL,
            [Password] NVARCHAR(128) NOT NULL,
            [DateCreated] TIMESTAMP DEFAULT CURRENT_TIMESTAMP
        )");

    // Insert an ADMIN user
    _dbConnection.ExecuteNonQuery(@"
        INSERT INTO Users
            (Username, Email, Password)
        VALUES
            ('admin', 'niemand.richard@gmail.com', 'test')");
}
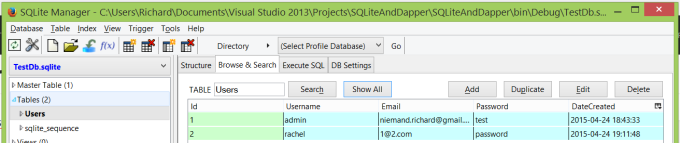
This will create and seed a Users table with an admin user.

Simple User model
Next, we will create a User class to represent an entry in the Users table. This class should have a property per column you wish to interact with from the target database table.
1
2
3
4
5
6
7
8
public class User
{
    public int Id { get; set; }
    public string Username { get; set; }
    public string Email { get; set; }
    public string Password { get; set; }
    public DateTime DateCreated { get; set; }
}
We will now make use of Dappers Query<T> method to map our admin user to the newly created User class.
1
2
var adminUser = _dbConnection.Query<User>(
    "SELECT * FROM Users WHERE Username = 'admin'")
Which results in the user being mapped like so:
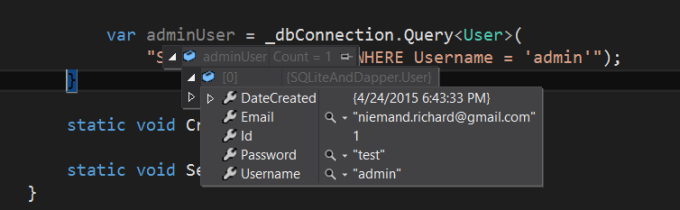
Dapper is amazing!
Creating a new user
Now it’s time to add a new user to the database, but only if the user doesn’t already exist. In order to do this, I will need to perform the following actions:
- Create a new
Userobject to save to the database - Check to see that the user doesn’t already exist
- Insert the user into the database
I will need to modify my ExecuteNonQuery() method a bit to make things easier.
1
2
3
4
5
6
7
8
9
10
11
12
13
14
15
16
17
18
19
20
21
public static void ExecuteNonQuery(
    this SQLiteConnection connection,
    string commandText,
    object param = null)
{
    // Ensure we have a connection
    if (connection == null)
    {
        throw new NullReferenceException(
            "Please provide a connection");
    }

    // Ensure that the connection state is Open
    if (connection.State != ConnectionState.Open)
    {
        connection.Open();
    }

    // Use Dapper to execute the given query
    connection.Execute(commandText, param);
}
This now allows for an optional object to be passed into the method, which is used by Dapper to replace any @parameter placeholders in the given command text.
To help make working with Users easier I added a new UserExtensions class to the project to house all database/user related code.
1
2
3
4
5
6
7
8
9
10
11
12
13
14
15
16
17
18
19
20
21
22
23
public static class UserExtensions
{
    public static void SaveAsNewUser(
        this User user,
        SQLiteConnection connection)
    {
        connection.ExecuteNonQuery(@"
            INSERT INTO Users (Username, Email, Password)
            VALUES (@Username, @Email, @Password)",
            user);
    }

    public static bool ExistsInDb(
        this User user,
        SQLiteConnection connection)
    {
        var rows = connection.Query(string.Format(
            "SELECT COUNT(1) as 'Count' FROM Users WHERE Username = '{0}'",
            user.Username));

        return (int) rows.First().Count > 0;
    }
}
This now allows me to add a CreateSecondUser() method to my Program class with the following body:
1
2
3
4
5
6
7
8
9
10
11
12
13
14
static void CreateSecondUser()
{
    var secondUser = new User
    {
        Username = "rachel",
        Email = "1@2.com",
        Password = "password"
    };

    if (!secondUser.ExistsInDb(_dbConnection))
    {
        secondUser.SaveAsNewUser(_dbConnection);
    }
}
This approach allows for more readable code, and helps a lot with code refactoring, as all of your management code is in one single place. After compiling and running the code I now have my second Rachel user.
Updating a user
I now add a GetUserByName() and SaveChanges() method to UserExtensions, allowing me to easily save any changes I make to a user back to the database.
1
2
3
4
5
6
7
8
9
10
11
12
13
14
15
16
17
18
19
20
21
public static User GetUserByName(
    this SQLiteConnection connection,
    string username)
{
    var userCollection = connection.Query<User>(
        "SELECT * FROM Users WHERE Username = @UserName",
        new {Username = username});

    return userCollection.FirstOrDefault();
}

public static void SaveChanges(
    this User user,
    SQLiteConnection connection)
{
    connection.ExecuteNonQuery(@"
        UPDATE Users
        SET
        Email = @Email, Password = @Password
        WHERE Id = @Id", user);
}
Next I add a ModifyAdminUser() method to Program with the following body.
1
2
3
4
5
6
7
static void ModifyAdminUser()
{
    var adminUser = _dbConnection.GetUserByName("admin");
    adminUser.Password = string.Format(
        "pass_{0}", DateTime.Now.Millisecond);
    adminUser.SaveChanges(_dbConnection);
}
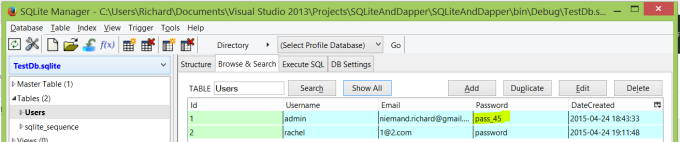
Compiling and running the project results in my admin users password being updated.
More, more, more users
I added a AddMoreUsers() method to Program to allow me to add user accounts easily. This method takes in a number of users to add and makes use of a RandomString() method I found online to help generate some unique usernames.
1
2
3
4
5
6
7
8
9
10
11
12
13
14
15
16
17
18
19
20
21
22
23
24
25
static void AddMoreUsers(int amount)
{
    var baseUsername = string.Format(
        "{0}{1}{2}{3}{4}{5}",
        DateTime.Now.Year,
        DateTime.Now.Month.ToString().PadLeft(2, '0'),
        DateTime.Now.Day.ToString().PadLeft(2, '0'),
        DateTime.Now.Hour.ToString().PadLeft(2, '0'),
        DateTime.Now.Minute.ToString().PadLeft(2, '0'),
        DateTime.Now.Second.ToString().PadLeft(2, '0'));

    for (var i = 0; i < amount; i++)
    {
        var tempUser = new User
        {
            Username = string.Format("{0}{1}",
                baseUsername, RandomString(4)),
            Password = RandomString(10),
            Email = string.Format("{0}@{1}.com",
                RandomString(12), RandomString(5))
        };

        tempUser.SaveAsNewUser(_dbConnection);
    }
}
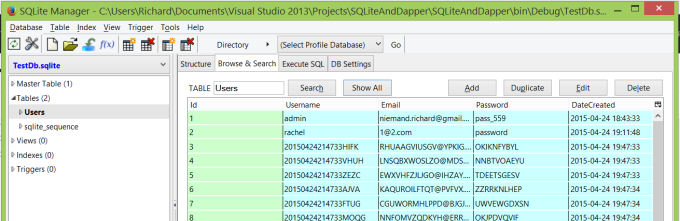
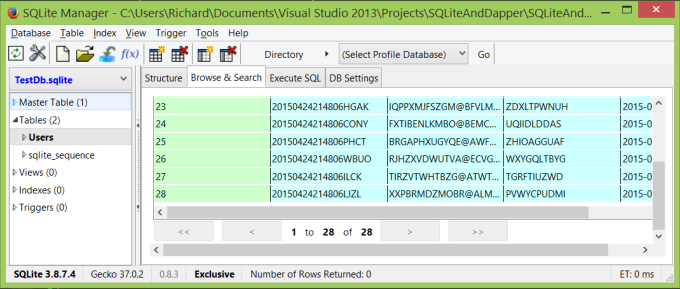
Now I have loads of user accounts to mess around with.
Removing a User
The last thing I would like to cover is deleting users from the DB. To do this I added the GetLastUser() and RemoveFromDb() methods to the UserExtensions class with the following body.
1
2
3
4
5
6
7
8
9
10
11
12
13
14
15
public static User GetLastUser(
    this SQLiteConnection connection)
{
    var userCollection = connection.Query<User>(
        "SELECT * FROM Users ORDER BY Id DESC LIMIT 1");
    return userCollection.FirstOrDefault();
}

public static void RemoveFromDb(
    this User user,
    SQLiteConnection connection)
{
    connection.ExecuteNonQuery(
        "DELETE FROM Users WHERE Id = @Id", user);
}
These methods allow me to add a new RemoveLastNonAdminUser() method to the Program class with the following body.
1
2
3
4
5
6
static void RemoveLastNonAdminUser()
{
    var user = _dbConnection.GetLastUser();
    if (user.Username == "admin") return;
    user.RemoveFromDb(_dbConnection);
}
Each time this method is run the last user in the database is dropped.

After another run of RemoveLastNonAdminUser()…
Source Code
The source code for this project can be found on my code-samples GitHub repository.
I welcome feedback and pull requests and am always open to any suggestions you may have.
I hope that you found this informative.
Comments powered by Disqus.