Running Mosquitto as a Windows Service
In my last post I ran over the required steps to get mosquitto up and running on a Windows environment. Now somewhere during my initial install I managed to break the Mosquitto Broker service that was installed by default, and ended up removing it using an elevated command window and the SC delete NAME command.
This post will cover re-creating this service, and showcase a really amazing application I found to make almost anything into a Windows service.
NSSM
I stumbled upon a nifty application called NSSM (or the Non-Sucking Service Manager) while attempting to fix my mosquitto installation, and I am glad I did!
It is available here and was created by Iain Patterson and as far as I can tell is free to use non commercially. Make sure that you download the nssm 2.24-101-g897c7ad version, and take either the 32-bit or 64-bit version depending on your system.
NSSM is command line driven (https://nssm.cc/commands), but has a built-in GUI should you prefer it (I sure do). I highly recommend placing the nssm.exe in a directory that is easy to get access to. For my case I just dropped it into my mosquitto installation directory:
1
C:\Program Files (x86)\mosquitto
In my last post I covered how to run mosquitto via a command line using:
1
mosquitto.exe -v -c mosquitto.conf
This is the exact command that we need to use for our mosquitto service. Adding it is simple using NSSM.
- Open an elevated command window and navigate to the directory containing nssm.exe
- Run
nssm installto bring up the service installation GUI - Enter in the following making sure to modify the paths for your installation
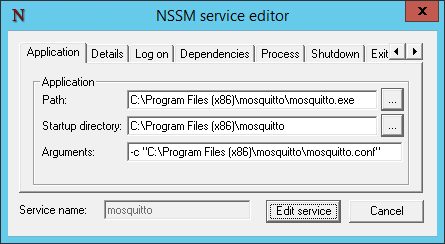
- Path: C:\Program Files (x86)\mosquitto\mosquitto.exe
- Startup Dir: C:\Program Files (x86)\mosquitto
- Arguments: -c “C:\Program Files (x86)\mosquitto\mosquitto.conf”
- Service Name: mosquitto
In the details tab give your service a name and ensure that the startup type is set to automatic.
Once done, click the install service button to create your service
You are done.
